Hi Readers,

I left the decision with you that the topic that we are discussing today is a feature or a bug which I found out recently in NAV 2017.
To Me, It's a feature but with my discussion with some professional, I think it depends on customer business how they want to consider this.
For some customers, it might be a feature but for some, they might want to remove it.
With Microsoft Dynamics NAV 2017, we can increase or decrease the inventory of an item from the item card itself.
** All magic happens in Codeunit 1327 (PostAdjustmentToItemLedger).
Points to remember - (Standard)
** In all these cases NAV will warn you if you try to change inventory. For all other cases system will post the transaction and inventory will change as per user selection.
Will be waiting for your comments and views. What do you think in terms of your customer? Is this a Feature OR Bug and why?
Regards,
Saurav Dhyani
saurav-nav.blogspot.in

I left the decision with you that the topic that we are discussing today is a feature or a bug which I found out recently in NAV 2017.
To Me, It's a feature but with my discussion with some professional, I think it depends on customer business how they want to consider this.
For some customers, it might be a feature but for some, they might want to remove it.
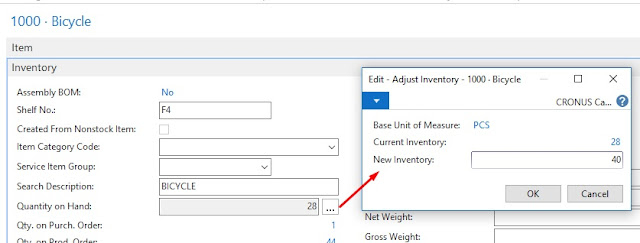
With Microsoft Dynamics NAV 2017, we can increase or decrease the inventory of an item from the item card itself.
- Navigate to Item card.
- Select assist Edit next to Inventory and enter the New Inventory.
- If New Inventory is less than current inventory a Negative Adjustment will be passed behind the scene.
- If New Inventory is greater than current inventory a positive Adjustment will be passed behind the scene.

Technically Speaking -
- As soon as we enter new Inventory and click ok.
- System Looks for an Item Journal template, Create a New Batch for the Item Journal.
- Insert a New Item Journal Line with Default Location as Blank.
- Post the Transaction.
- Delete the Batch Created.
** All magic happens in Codeunit 1327 (PostAdjustmentToItemLedger).
Points to remember - (Standard)
- All the Transaction posted with this will always post with Blank Location Code.
- The process will not work if item is Mandatory Serial / Lot Tracked.
- Unit of Measure will be picked from Item Base Unit of Measure.
** In all these cases NAV will warn you if you try to change inventory. For all other cases system will post the transaction and inventory will change as per user selection.
Will be waiting for your comments and views. What do you think in terms of your customer? Is this a Feature OR Bug and why?
Regards,
Saurav Dhyani
saurav-nav.blogspot.in
Comments
Post a Comment