Hi all,
In Previous posts we discussed how to install NAS and configure NAS on your system.
Please move ahead with steps only if you have one NAS installed as discussed in previous post.
*Remember NAS is Company Specific (It means once instance of NAS cannot run for multiple companies).
What is my client want to have use NAS in two companies or two databases.
Let's see how we can do that.
Default Installation Path for NAS is - C:\Program Files (x86)\Microsoft Dynamics NAV\60.
1. Navigate to the folder and copy and paste it to same location as shown below.

2. Name the copied folder as per your requirement. I name it as "Application Server2".
3. Now we need a service that will be used to activate and configure it.
4. Open Command Prompt (RUN AS ADMINISTRATOR).
5. Navigate to new folder path with following command -
cd C:\Program Files (x86)\Microsoft Dynamics NAV\60\<FolderName>
in my case
cd C:\Program Files (x86)\Microsoft Dynamics NAV\60\Application Server2
6. Click Enter Your Command Prompt Should look like this.

7. Copy and Paste Below Command on Notepad.
nassql.exe appservername=NAS2, NETTYPE=TCP, servername="INDEL-SXD6995N1",database="Demo Database NAV (6-0)", company="Company For NAS2", nettype=tcp,startupparameter=”JOBQUEUE”, objectcache=40000, installasservice
8. Change below listed parameter as per you requirement.
a) AppServerName - Name of NAS Instance you want to give.
b) Server Name - Name or IP of your Server.
c) Database - Database Name on the server.
d) Company - Company Name for which you want to configure.
9. Copy the command into command prompt and click enter.
10. NAS2 is installed and you will get a confirmation on Command Prompt as shown below.

11. Now let's navigate to services.msc to check the new service created.
12. We have a new service named NAS2 As shown below.

13. Now change the login to windows Login and open configuration panel of NAS.
14. Click and Select New Application server.
15. Enter Details of server and Service Name (as per new service created).

16. Other details are already filled in while creating service.
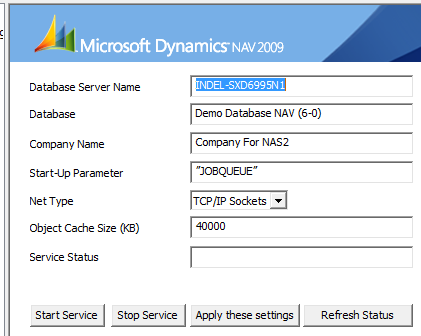
17. Just click start and service will be started.
Hope you will be able to configure multiple NAS Session in your system.
* In case you are planning to configure NAS for Native Client then in step 7 Use Nas.exe instead of NasSQL.exe.
Regards,
Saurav Dhyani
http://saurav-nav.blogspot.in/
Comments
Post a Comment