Hi all,
I think I got late with this post, but I was unaware that most of us still don't know how to add reports in Role Tailored Client Reports.
So let's have a look on the same. For the demo purpose I will use standard report with ID 111.
Steps -
1) Design the Report.
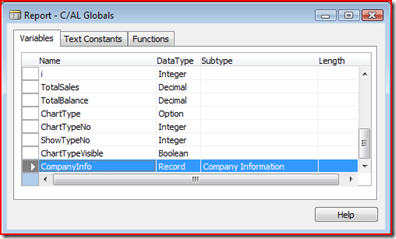
2) Add a new global variable of company information in CAL Global say companyinfo as shown below.
I think I got late with this post, but I was unaware that most of us still don't know how to add reports in Role Tailored Client Reports.
So let's have a look on the same. For the demo purpose I will use standard report with ID 111.
Steps -
1) Design the Report.
2) Add a new global variable of company information in CAL Global say companyinfo as shown below.
3) Now we will get companyinfo in onPreReport Trigger and compute value of picture as its a blob field.
Companyinfo.GET;
Companyinfo.Calcfields(Picture).
* Add above lines in onPreReport Trigger.
We need to do this to have the dataset field name to be available for us in Visual Studio.

5) Let's open report layout by Tools - View Layout.
6) You will find a new entry in Dataset as shown below.

7) Now lets add this to the report.
a) We need to add the Company Picture first as a TextBox to the body of the report.
This will enable us to use it in the Page Header. We add this TextBox in top of the Body.
b) We give the TextBox the following properties:
Value: “=Convert.ToBase64String(Fields!CompanyInfo_Picture.Value)”
Name: “CompanyPicture”
Visibility Hidden: “True”
Color: “Red”

8) As we all know that for anything in header we need to add code in report properties, code tab. So lets now add code there. Below is the function that will be required.
Shared PictureData as Object
Public Function GetPicture() as Object
Return PictureData
End Function
Public Function SetPicture(NewData as Object)
if NewData>""
PictureData = NewData
end if
End Function

9) Now let us add the Image control just as we did for the embedded scenario. Open the Toolbox and add a Image control to the Report.

10) Here are the properties that we need to set for this image control -
Value: “=Convert.FromBase64String(Code.GetPicture())”
Source: “Database”
MIMEType: “image/bmp”
11) Add textbox to Page Header.
Note! This textbox has to be placed above the Picture control just added
Value: “=Code.SetPicture(ReportItems!CompanyPicture.Value)”
Visibility Hidden: “True”
Color: “Red

12) Save and import RDLC changes, and then compile report in Classic client.
13) Run the Report from RTC Client and here is the expected output.

* Keep reading, commenting and suggesting on which topic you require post.
Thanks & Regards,
Saurav Dhyani
www.sauravdhyani.com
Comments
Post a Comment